The last time I visited my friend’s house, he was confused about the Cricut setup for Mac. So, I helped him with the entire Cricut setup. The process took a little longer as he wanted to learn so he could setup his next Cricut machine (that he will buy in the future) himself. While teaching him, I thought of writing this blog for people who are beginners and haven’t setup Cricut yet.
So, what are we going to get in this blog? Well, I want you to ensure that you have the system requirements for Mac. This is the first thing to ensure. Otherwise, incompatible Mac computers may interrupt the setup. Then, we will connect the Cricut to a Mac via Bluetooth and finally complete the Cricut setup. Don’t worry! The setup is a piece of cake, and you will be able to do it yourself in one go! Let’s get straight into it!
Minimum System Requirements for Cricut Setup on Mac
Now, you need to know the basic needs for the Cricut setup. It is essential to know the basic needs because we will download and install Design Space. If your Mac does not meet the basic needs, it will fail to run properly. Hence, you have to ensure that your Mac is compatible with Cricut.
Below, I have mentioned some basic system requirements. You can go through them and check accordingly:
- Operating System – macOS 11 or later
- CPU – 1.83 GHz
- A USB port or Bluetooth Connection is required
- Disk – 2 GB
- RAM – Minimum 4 GB
- Display – Minimum 1024px x 768px screen resolution
If your Mac meets the above requirements, the Cricut setup will be easier for you! Now, let’s move to the next step, which is to connect Cricut to Mac via Bluetooth.
Establish a Connection Between a Cricut Machine and Your Mac
So, are you ready to complete the Cricut setup for Mac? But wait, there is something left! It is nothing but connecting Cricut to Mac via Bluetooth. Yes, first, we will understand the proper way to connect your Cricut wirelessly. After that, we will see how to setup Cricut.
Below, I have provided the steps to connect Cricut to a Mac computer via Bluetooth:
- First, you have to turn on Cricut and then power on your Mac computer.
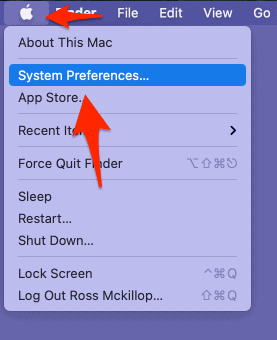
- After that, turn on the Bluetooth on your Mac. To do this, you have to go to the Apple menu.
- Then, you need to select the option System Preferences.
- Afterward, look for the Bluetooth option and then turn it on.
- Next, select the Pair and enter the PIN code, i.e., 0000.
- In the last step, choose the Cricut machine and hit the Pair button.
Now that our Cricut is connected to a Mac via Bluetooth let’s focus on how to setup Cricut.
Cricut Setup for Mac: 5 Quick and Easy Steps
So, are you ready to setup your Cricut? Here, we are to setup our Cricut machines on Mac. I assume you have checked all the system requirements before following the steps below.
The simple steps that I have provided below are recommended for Cricut users to follow carefully:
- Confirm whether you have properly connected to Bluetooth (see the above section to connect).
- Then, you have to visit Cricut’s website – design.cricut.com/setup in your browser.
- When you are on the site, you will be moved to download the Cricut Design app on your Mac computer.
- Now, you should follow the steps presented on your screen to sign in or create your Cricut account.
- By following the screen prompts, you will be able to completethe Cricut setup for Mac.
Now, you will see that your machine is setup, and you can proceed to use it without much struggle.
FAQs
Question 1: Can I use my Mac computer for Cricut setup?
Answer: Certainly, yes! Cricut setup is hassle-free on Windows, Mac, Android, and iOS devices. Even a Mac can be the best computer you can ever use. The process of setting up the Cricut is quite similar on both Windows and Mac computers. But before proceeding to setup, you must ensure the minimum system requirements of your Mac so that you can install or run the Cricut app easily. However, the Design Space app is essential during setup.
Question 2: How to update my Cricut Design Space on Mac?
Answer: Update your Cricut software by following the steps below:
- First, power on your Cricut and connect it via a USB cable or Bluetooth.
- Also, you might receive an alert anytime for your firmware update.
- Once connected, you have to hit Update to proceed with the update.
- After that, your update process will start.
- Here, the power button will turn red or purple, meaning an update is in progress.
- After completion of the update, the machine will shut off and back on automatically.
- Click on Done to cancel the Windows and start making projects again.
Question 3: How to download Cricut Design Space on Mac?
Answer: To download the Cricut app on your Mac system, follow the steps below:
- Navigate to design.cricut.com and check the box to select the Download tab.
- Now, you will see a page where you will need to choose the location to save your file.
- Choose and hit save to begin downloading.
- After downloading, move ahead and clickthe .dmg file.
- Next, drag the Cricut icon to the Applications folder to begin the installation.
- Now, you have downloaded and installed the software on your Mac.
Final Words
Finally, we have completed the Cricut setup for Mac. Make sure you create your Cricut ID to sign in to your account. Otherwise, you will not be able to use or start editing your design on Design Space. The simple steps that I have explained in this blog are easy to follow and will help you setup any Cricut models. Whether they are Maker, Explore, or Joy series, all of them can be setup with this guide. Start setting up the machine and get your crafting journey started in no time.
