Last month, my son proposed to her childhood girlfriend, and she said yes! Since then, they have planned to make everything perfect for their special day. Being a mother and a businesswoman, he entrusted me with the duty of creating a custom-made Cricut wine glass, especially for them. It’s crystal clear that it is very difficult to create any design on glass as it is a sensitive material.
With a Cricut cutting machine, I won’t have to worry because supplies help me balance everything. The possibilities for making projects with the Cricut machine are endless. If you intend to make wine glasses with Cricut, there are a few supplies needed to help users complete their art quickly. In this blog, I will introduce you to the steps that will help you create the glass of your choice.
Stage 1: Create a Design on the Cricut App
If you intend to make a Cricut wine glass, open the Cricut designing software (Design Space) and tick the New Project option. After that, press the Upload tool, select your design from your system folder or given under the Recent Uploads,and then press the Insert Image button.

Now, fill in the space between the letters by selecting the Weld option mentioned under the Layers panel. Next, select the whole text, increase its size per your preference, and change its color from the material color dropbox.
After deciding on the text color, tick the Make It box and check that the design is correctly aligned. If not, return to the canvas, make the required changes, and hit the Make It button again.

Stage 2: Turn on Your Cricut Machine & Cut the Material
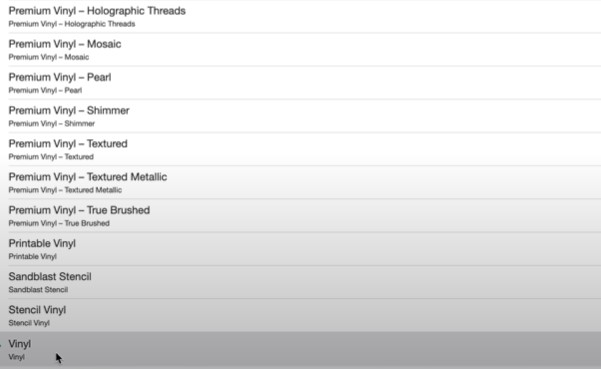
In order to choose the Cricut wine glass material, press Browse All Materials and select your material from the list before you. After finalizing the material, click the Done option and change the blade pressure to Default. Following this, load the Fine-Point Blade into Clamp B properly.
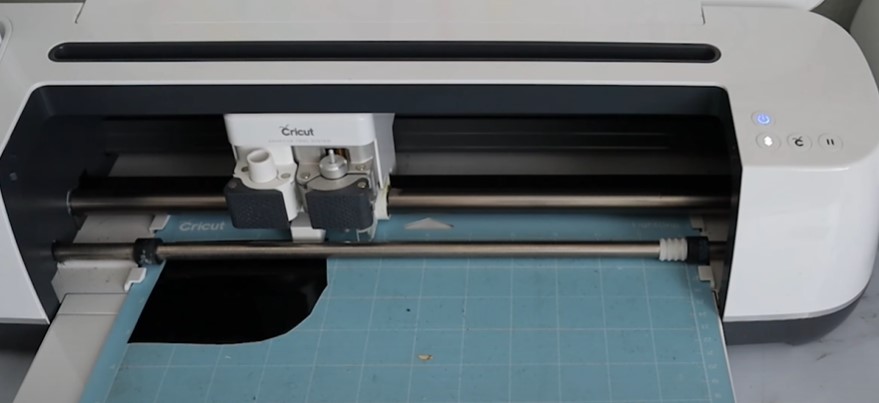
Then, cut a portion of your Cricut material and place it on the BlueGrip cutting mat. Next, load your mat and press the machine’s flashing power button. At this point, you are supposed to wait till the Cricut machine is cutting the material. After the process ends, remove the material from the BlueGrip mat.
Stage 3: Remove Your Design & Apply Vinyl
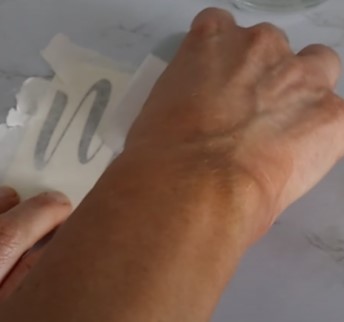
Following this, take your Cricut weeding tool and remove the extra vinyl covering your main design. Now, use alcohol-free baby wipes or a lint roller to clear your glass blank. After that, cover your design with a Cricut transfer tape and use a scraper tool to connect the design and the tape properly.
Stage 4: Reveal Your Cricut Wine Glass
After a few minutes, start peeling off the transfer tape and then trim the extra tape with the Cricut scissor. Following this, place the design with your fingers or scraper tool to avoid any space or wrinkles between the design. Finally, start peeling off the transfer tape and repeat the same steps to stick the design on the second glass.
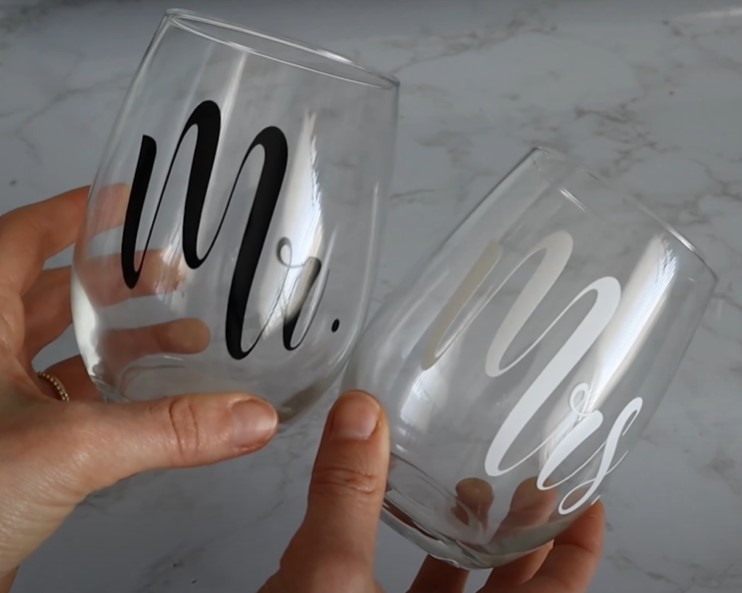
Congratulations on successfully completing your first-ever glass project made with a Cricut machine. I wish you all the best in the future and hope you shine like a star in the crafting world.
Final Words
This blog helped you understand the complete process of making customized Cricut wine glass using a craft plotter and its supplies. However, it’s compulsory for all users to ensure that they are taking the correct steps while making any glass-related craft out of a cut-die machine. Keep going by making new projects, as they will boost your creativity skills.
Frequently Asked Questions
Question: Can I Put Customized Cricut Wine Glasses in Dishwasher?
Answer: If a customized Cricut wine glass is made with permanent adhesive vinyl, you can surely place it inside the dishwasher. To increase their lifespan, you are advised to wash the glass with your hands using warm water and light soap. This will balance the quality and shininess of the glass.
Question: Where Will I Get Unique Designs for My Wine Glasses?
Answer: The Design Space app is the best option if you are searching for unique designs you want to use while making customized wine glass. It is the designing software where you will come across unlimited images, designs, fonts, and ready-to-use projects, helping you make the design look more attractive.
Question: Which Cricut Supplies Do I Need to Make Wine Glasses?
Answer: The complete list of crafting supplies that you will need while making personalized wine glasses is as follows:
- Cricut cutting machine
- Design Space account
- Cricut BlueGrip cutting mat
- Cricut materials
- Transfer tape
- Wine glass blank
- Baby wipes or lint roller
- Weeding tool
- Scraper tool
Visit: cricut.com/setup
